This is the only new recipe I made for Thanksgiving this year. It was a weird, rare holiday for us... we stayed home and just had dinner for two. Usually we spend it with family, or we host it at our house for friends. But we were invited to dessert and partyin' at a friend's house afterwards, so we told her we'd bring dessert. I was inclined to make something pumpkin-based, but she said her roommate was making a pumpkin dessert. So in a panic, I looked through my pantry and decided to go with peanut butter, pecans and cream cheese because that's what I had. Admittedly, I got a little inspiration from a well-known indulgent southern cook... but I changed up her boring recipe, and it came out awesome. (Plus, her cooking times were jacked up and anyone who would have used her recipe would have been eating her "cookies" with a spoon.) Mine is like a peanut butter cup crossed with cheesecake. WAY easy, too!
I'm not sure why, but I decided to go with some Gimmes for this recipe. Peanut butter is always "fun" for me, and so are the Gimmes. It was so hard to choose which song I wanted to use! But what says peanut butter more than sailing? Duh. Me First and the Gimme Gimmes playing their live cover of "Sloop John B". -jen
Prepare a 9x13 baking dish with non-stick cooking spray. In a medium bowl, combine all of the crust ingredients. Press dough into the pan, making sure it covers the entire bottom evenly and goes up the sides just a little. Bake for 15 minutes until lightly browned and set aside.
In a mixing bowl, combine cream cheese, peanut butter, sugar and vanilla, beating until smooth with an electric mixer. Incorporate eggs one at a time. Fold in by hand 1 cup pecans and chocolate chips and spoon over partially baked crust, smoothing it out until it's even. Bake for 40-45 minutes until edges begin to brown and the center doesn't look wet and jiggly. Let cool completely before cutting and serving.
Ha! I tried to make it fancy... but it looks pretty globby. I'm still working on the pictures, man! I only have a point-and-click camera and some shitty kitchen lighting!
We love garlic in our house even more than we love bacon. Massive quantities of garlic go into just about everything we cook. I've been meaning to make some more soup recently because we had several containers of vegetable broth in the freezer as well as bags full of frozen veggies to make more stock, so I knew I had to use some up. Roasted garlic soup is something neither of us had tried, but we've seen it on a few cooking shows and wanted to try it! Lots of the recipes I saw online were for a completely smooth, creamy soup, but I wanted a little bit of chunky vegetable bite in mine. Man, this soup came out great... we'll be making this one again soon, no doubt!
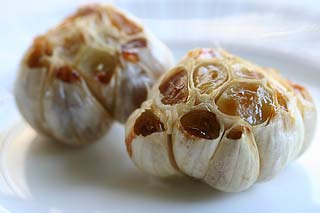
If you're not real familiar with the qualities of roasted garlic, I think it's important to explain that as the garlic roasts, it loses it's sharp, pungent taste and becomes much more mild and sweet. So if you're not as into garlic as we are, don't let the 4+ heads of garlic in this recipe scare you away! It's really got a pleasant, smooth flavour to it.
Thought I'd go with some F-Minus for this recipe... we'd just finished watching the movie/documentary "Give 'Em the Boot" again the other night, and I was thinking how I don't have many female singers posted on the blog here. So F-Minus, performing "Light At the End". -jen
3/4 cup finely diced red bell pepper (or 1 small pepper)
3/4 cup finely diced carrot (about 2 medium carrots)
1 and 3/4 cup finely diced Yukon Gold potato (or 1 medium potato)
1 tablespoon minced garlic
3 tablespoons flour (or 1/4 cup for a thicker soup)
1 quart vegetable or chicken broth
4 bulbs of roasted garlic (see roasting instructions below, takes an hour to roast)
1 teaspoon Worcestershire sauce
1 tablespoon sherry
1/4 teaspoon dried thyme
1 cup heavy cream
black pepper to taste
shredded Parmesan cheese and lemon wedges for serving
To Roast Garlic: Preheat oven to 400 degrees. Chop the tops of the garlic heads off. Peel away the outer skins (leaving the clove skins in tact). Place on aluminum foil. Drizzle with olive oil and sprinkle with a pinch of salt and a pinch of pepper. Fold foil up around garlic heads and seal. Place foil packet in oven, directly on rack, and bake for 1 hour. Remove from oven, carefully open foil, and allow to cool. To remove garlic from the garlic paper, just squeeze the whole head and the garlic will deliciously ooze out... just be careful not to mix any of the garlic paper in.
** For this soup recipe, I took about 1/2 a cup of the broth and the roasted garlic and blended it until smooth. I highly suggest doing this.
In a stock pot, heat butter over medium-high heat. Add diced onion, bell pepper, carrot, potato and minced garlic. Cook until onion and pepper are tender, 5-7 minutes. Stir in flour to coat vegetables and cook another 3-5 minutes. Add stock and roasted garlic all at once and whisk so that the flour doesn't clump. Add Worcestershire, sherry and thyme. Bring to a boil, then simmer for 25 minutes. Stir in cream and let simmer an additional 10 minutes.
To serve, place Parmesan cheese in bottom of bowl, ladle soup over the cheese, and squeeze the juice of 1-2 lemons into soup.
We should have carved our traditional pumpkins last night because it was Halloween, but instead, I ended up carving up a Red Kuri squash. Actually, I didn't carve it up, because I couldn't get my damn knife through the thing! So I had to wait for Justin to get home from work to cut it for me. There was intoxication involved and I figured I should give up while I was ahead and still had all my fingers. Those suckers are thick (the squash, not my fingers... or maybe my fingers too)!
Thoughts on Red Kuri squash: my favourite squash we've tried so far! I had to taste it after roasting it for the soup, and with just some olive oil, salt and pepper, it had this rich, delicious, buttery flavour. Not as sweet as some squash is, and I knew it was going to be perfect in soup.
Exploring different types of squash this fall has been a lot of fun, and this Red Kuri's been sitting on our table, waiting to be used. Squash-leek soup sounded great, but I didn't really want the thickness of traditional squash soup, I wanted a thinner, brothy soup. I just happened to have the other veggies in the fridge and they needed to get used up, but they were a really great addition, I liked having something to chew instead of a smooth soup and I would definitely recommend them (though you could easily leave them out if you chose). If you're looking for a thicker soup, you could very easily just cut the chicken broth back by half (or more, depending on the consistency you're looking for). The soup was quick and basic, but perfect for the cold, wet night we had. I wanted it to have just a little heat in it, so I used some white pepper and cayenne pepper, but if you're not into heat, you can leave them out.
I've been on an Against Me! kick for the last two weeks, and I had several of their albums thrown on my playlist on repeat while making this... so it was a no brainer for music! This is one of mine and Justin's all-time favourites, "What We Worked For". -jen
RED KURI SQUASH-LEEK SOUP Prep Time: 1 hr, 15 minutes Cook Time: 5-10 minutes
Difficulty: Medium
1 Red Kuri squash
olive oil
salt & black pepper
8-oz crimini mushrooms, diced
1 orange bell pepper, diced
1/2 cup very small broccoli florets
1 tablespoon minced garlic
3 large leeks, greens removed and whites diced
2 quarts chicken stock (or vegetable stock if you prefer)
1/2 teaspoon rubbed sage
1/2 teaspoon white pepper
1/4 teaspoon cayenne pepper
Preheat oven to 425 degrees F.
Quarter the squash and remove seeds and membrane. Rub enough olive oil over the exposed flesh to coat, and then generously salt and pepper them. Bake at 425 degrees for one hour. Set aside. Remove skin when squash has cooled enough to handle.
In a stock pot, heat 3 tablespoons of olive oil over medium-high heat. Add mushrooms, bell pepper, broccoli and minced garlic. Saute until softened, 5-7 minutes. Remove from pan and set aside.
Heat 2 more tablespoons of olive oil in same stock pot, over medium-high heat. Add leeks and saute until tender, 10-12 minutes. Puree leeks, squash and broth together. (If you have an immersion blender, you can add squash and broth to pot and blend. If not, remove leeks from pan and place in a blender with the squash and enough broth to puree, then pour back into stock pot with any remaining broth.) Add the sauteed mushrooms, pepper and broccoli. Stir in sage, white pepper and cayenne pepper. Heat to serve.
This is a recipe I came up with a few years ago and I think it's time to whip it out for the blog! We always had roasted pumpkin seeds after carving Jack-O-Lanterns when I was growing up, but they were only salted and I never dug them all that much. A few years of toying with seasonings and this is what resulted... now we roast them every year! Sometimes we even go back for more pumpkins, just for the seeds! And we've got our pumpkins picked out, ready to carve next weekend... so we'll be making these again to munch on.
Went with "Code Blue" by TSOL... it seemed like it was in the spirit of Halloween (or necrophilia, whichever). -jen
heaping tablespoon of bacon salt (or seasoning salt)
1 tablespoon cumin
1 tablespoon coriander
1 tablespoon Caldo de Pollo (or powdered chicken bullion)
1 teaspoon sugar
couple dashes of cayenne pepper
couple dashes of black pepper
3 tablespoons melted butter
2-3 tablespoons Worcestershire sauce
Preheat oven to 250 degrees F.
Combine all dry ingredients in a small mixing bowl until well combined.
Rinse
pumpkins seeds to get all the pumpkin guts off. Spread out onto paper towels and pat dry. Pour dried
seeds into a large mixing bowl. Pour
melted butter and Worcestershire over seeds and mix. Sprinkle about 1/2
of the seasoning onto the buttered seeds and mix... then add more seasoning if desired - some people like them slightly seasoned, some like them heavily seasoned. (I used about 3/4 of the mix and saved the rest to season
some meat for tacos).
Spread the seasoned seeds out in a
single layer on a cookie sheet and roast for 1 hour and 20 minutes,
stirring the seeds up every 15-20 minutes.
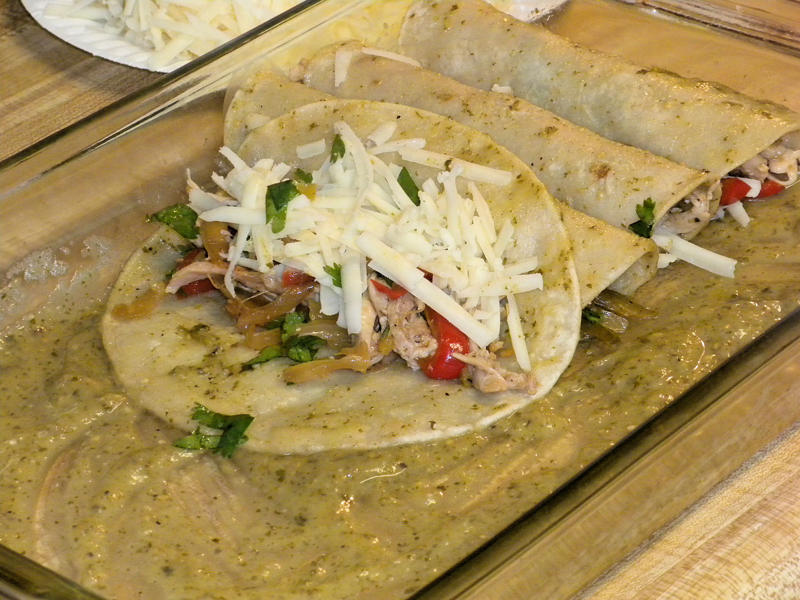
This is Part 2 of our Tall Cans recipes. The first recipe, Tall Can Mexican Black Beans, was actually made with a whole tall can of Tecate. Between the enchiladas and salsa verde here, it's really only 2/3 of a tall can of Tecate, but that just leaves the extra 1/3 for you to finish off. I really liked the beer flavour in the salsa verde. I don't usually use beer when I make it, so this was a first, and I think I'll make it with beer from now on!
Much like the black bean recipe, these recipes were inspired by the
Transplants' song, "Tall Cans In The Air." But since I used that song
for the bean recipe, I think it's fitting that I use a different
Transplants song. Justin and I always joke about their song, "Gangsters
and Thugs", because living in Humboldt County, we can relate to the
chorus, "...some of my friends sell records, some of my friends sell
drugs." It's a good sing-a-long, kiddies. -jen
ENCHILADAS DE POLLO (Chicken Enchiladas) Difficulty: Medium Prep Time: 30-45 minutes Cook Time: 20 minutes (not including the chicken baking) Makes: 15-20, depending on the size of your chicken thighs
6 baked chicken thighs
vegetable oil
1 medium onion, julienned
2 red bell peppers, julienned
2 jalapeños (de-seed for less heat), julienned
1 tablespoon minced garlic
1 cup Tecate beer
1 can (4oz) diced green chiles
1/4 cup cilantro, chopped
1 teaspoon cumin
salt and pepper
corn tortillas (15-20)
salsa verde (see recipe below)
2 cups shredded Monterey Jack cheese
*I seasoned the thighs under the skin with salt and pepper, but left the skins on to bake. Baked at 450 degrees F for 30 minutes. Let cool.
Preheat oven to 350 degrees F.
In a large skillet, heat 2 tablespoons of vegetable oil over a medium-high heat. Add onion, bell pepper, and jalapeños. Sautee for about 5 minutes. Add garlic, Tecate, and 1/2 teaspoon salt, 1/4 teaspoon pepper. Continue cooking until all of the liquid has disappeared and vegetables are soft. Remove from heat to cool.
Discard the chicken skin and shred the chicken meat from the bone into a large mixing bowl. Add the cooked vegetables, green chiles, cilantro and cumin to the chicken, mixing. Taste and add additional salt and pepper to taste.
"Wet" tortillas, fried and dipped in salsa
Place 1/2 a cup of the salsa verde into a shallow dish (I like to use a pie plate) and have an additional plate available to hold the "wet" tortillas.
In a small skillet that will fit a single corn tortilla, heat enough oil just to cover the entire bottom of
the skillet over a medium-high heat, and keep the oil nearby for refills. Using tongs, place a corn tortilla
into the hot oil for 5 seconds, then flip and cook 5 seconds on the other side. Let the excess oil drip into your pan and place the tortilla right into the salsa, just to coat. Remove from salsa, letting excess salsa drip back into pie plate and set the wet tortilla onto your extra plate. Repeat, stacking the wet tortillas on top of each other on the plate until finished. Add oil to your skillet and salsa to your pie plate as needed.
Create an assembly line with your stack of wet tortillas, shredded chicken mixture, shredded cheese, and a large, rectangular baking dish. Place a thin layer of salsa verde on the bottom of your baking dish. Set a wet tortilla into the baking dish, fill with shredded chicken mixture and shredded cheese, and roll, placing the enchilada seam-side down. Continue until your baking dish is full. Spoon the remainder of your salsa (about 1/2 a cup) over the enchiladas, as well as the remainder of your shredded Jack cheese (also about 1/2 a cup).
1 can (28oz) tomatillos, drained (or 7-8 fresh, large tomatillos, roasted)
1 can (4oz) diced green chiles
1 cup Tecate beer
1 teaspoon chicken base (or 1 chicken bouillon cube)
juice of 1 lime
1 tablespoon minced garlic
1/4 cup cilantro, chopped
2 teaspoons dried Mexican oregano
1 teaspoon cumin
salt & pepper to taste
In a medium sauce pan, heat oil over medium-high heat. Add onions and cook for 5 minutes until translucent and tender. Add all remaining ingredients except salt and pepper. Bring to a boil, then turn heat down to simmer for 25 minutes. Pour into a blender to puree (but don't fill your blender more than half-way or it could explode hot salsa all over you! Ouch! Work carefully in batches... or use a stick blender and avoid that whole mess.) Add salt and pepper to taste.
I love when a recipe is actually inspired by a song, rather than coming up with a recipe and then searching for a song to go with it! I'd been in a Tim Armstrong mood the other day (when aren't I?), but wasn't feeling like Rancid, so I pulled out both albums by the Transplants. As soon as I heard the song "Tall Cans In The Air", I knew I had to do a beer recipe with tall cans! I brainstormed a lot of ideas (and will still do more), but in the end, I decided going with a Mexican theme. The black beans are Part 1 of my Tecate dinner, and they came out great! I'm not even a big fan of beans, but seasoned with all these great flavours, I couldn't help but love 'em.
Justin and I actually were discussing whether or not we could taste the beer in the beans... 3 cups in a recipe is a hell of a lot of beer. However, it didn't really seem to stand out. There wasn't a super distinct beer flavour, but I'm sure after simmering for hours with a load of other flavours, it's just going to blend in with the rest. I wouldn't change the recipe at all... though I might be inclined to try a darker beer next time, perhaps a Negro Modelo?
And so I present to you the Transplants (whom I've been listening to all week), doing "Tall Cans In The Air"... lemme see 'em! -jen
TALL CAN MEXICAN BLACK BEANS Difficulty: Medium Prep Time: Overnight soaking Cook Time: 3-4 hours Serves: 6-8
1 pound dried black beans
8 cups water
5 cups chicken broth
1 tall can (24oz) Tecate beer (separated)
1 can (28oz) diced tomatoes
1 medium onion, chopped
1 red bell pepper, chopped
2 jalapeños, chopped (de-seed for less heat)
3 heaping tablespoons minced garlic
1 can (4oz) diced green chiles
1/2 cup cilantro, chopped
juice of 1 lime
3 bay leaves
2 teaspoons cumin
2 teaspoons coriander
2 teaspoons dried Mexican oregano
1 teaspoon salt
few dashes of Green Tabasco
Sort through dried beans to check for small pebbles. Soak in 8 cups of water overnight.
Using a colander, drain soaking water from beans. Place beans in a large stock pot with 5 cups of chicken broth and 2 cups of the Teacate beer. Bring to a boil. Cover and turn heat down to simmer for 1.5 hours.
Add tomatoes, onion, bell pepper, jalapeños, garlic, green chiles, cilantro, lime juice, bay leaves, cumin, coriander, oregano, salt, Tabasco, and remaining 1 cup of Tecate. Continue simmering with the lid off for another 1.5-2 hours. Part way through the second simmer, using a masher, mash up some of the beans to help thicken the sauce. Cook down until desired consistency. Sauce should be slightly thickened, but they shouldn't be soupy.
This is my first attempt at BBQ (note: I have grilled extensively before but never done true, low n' slow, smoked BBQ) and I have to say that the flavor was spot on, though I need to work on getting better color to the finished product. We ate it all before I could get a pic but we'll be doing this again soon so we'll add pics when the next round is attempted.
We have a gas grill so I used that and have to say that the temp control was a cinch. One of the three burners on low was a perfect grill temp of 225 F which exactly what you want. I used a blend of wood chips, half hickory and half apple wood, and the flavor and smell were awesome! An Oneida Digital Probe Thermometer let me know when the internal temp hit 145 F, after about 4.5 hrs in the smoke, and I pulled it, wrapped it in heavy duty aluminum foil, and let it rest for 15 minutes before slicing off the first taste.
It was perfectly medium rare inside but little to no smoke ring present, even though it had the smokey flavor. The dry rub on the outside of the roast didn't quite turn into the "bark" you see on good BBQ but it was definitely an amazing flavor, none-the-less. Since my smoke wasn't super heavy, I'm assuming it didn't color the meat, hence my desire to get more smoke on it next time.
The dry rub recipe contained herein is one of my own devising that would work amazingly on any beef or pork cut and can be applied the night before or the morning of.
A slab o meat, closely resembling brisket, made me think of Jewish deli and our love of pastrami and other cured meats. So, here's some NOFX doing their song, The Brews about hardcore Jewish punk lifestyle. "We separate our milk plates from our meat! Oi, oi, oi!" - justin
Tri-tip Dry Rub Time: 10 min Difficulty: Easy Servings: Enough to cover a 3lb roast
1 1/2 tsp salt
1 1/2 tsp dark brown sugar
1 tsp ground black pepper
3/4 tsp Accent
3/4 tsp ground white pepper
3/4 tsp sweet paprika
3/4 tsp thyme
3/4 tsp rosemary
1/2 tsp cayenne pepper
1/2 tsp onion powder
1/4 tsp garlic powder
1/2 of a bay leaf
Just toss all of this in a spice grinder, or a mortar and pestle, and grind thoroughly. Apply to meat the night before cooking, or at least a couple hours before, and enjoy!
Tri-tip Smoke Steps:
Apply the rub to the roast, place in a plastic bag and leave in the fridge overnight.
Remove from the fridge at least an hour before smoking to let the meat come up to room temp.
Get your gas grill up to temp by turning one burner, not the middle, on as low as it'll go and wait a half hour or so for the grill to reach 225.
While the grill is heating, soak your wood chips in warm water for 15-30 minutes and place them in either foil pouches, or an old tuna can or some sort of metal container that will not give off fumes.
Place you wood chips over the single burner and let the smoke build in the grill before adding the roast.
Place your meat in the grill on the opposite side of the lit burner. You're trying to cook using indirect heat, not the using flames like you would with grilling meat.
Place a drip catch under your meat. Foil works fine.
Insert your digital probe thermometer, if you're using one, and set it to go off at 145 F.
Open a beer and enjoy the smell. Wait.
When the meat is done, use tongs to pull it off the grill and wrap it in foil. Set it aside to rest for 15-20 minutes.
Cut it in slices, against the grain, and eat your heart out!